


Advance Payments
by MAC5
| Technical name | account_payment_advance_mac5 |
| License | OPL-1 |
| Website | https://apps.odoo.com/apps/modules/browse?author=MAC5 |
| Extensions | Sales Advance Payments |
Advance Payments
Way to create advance payments for specific account and apply them later on invoices
Features:
- New Advance Payments menu
- Apply advance payments later on customer invoices or vendor bills
- Multiple currencies are supported
- Multiple advance payments can be applied to multiple invoices / bills
Configurations
Create new Accounts for Advance Payments
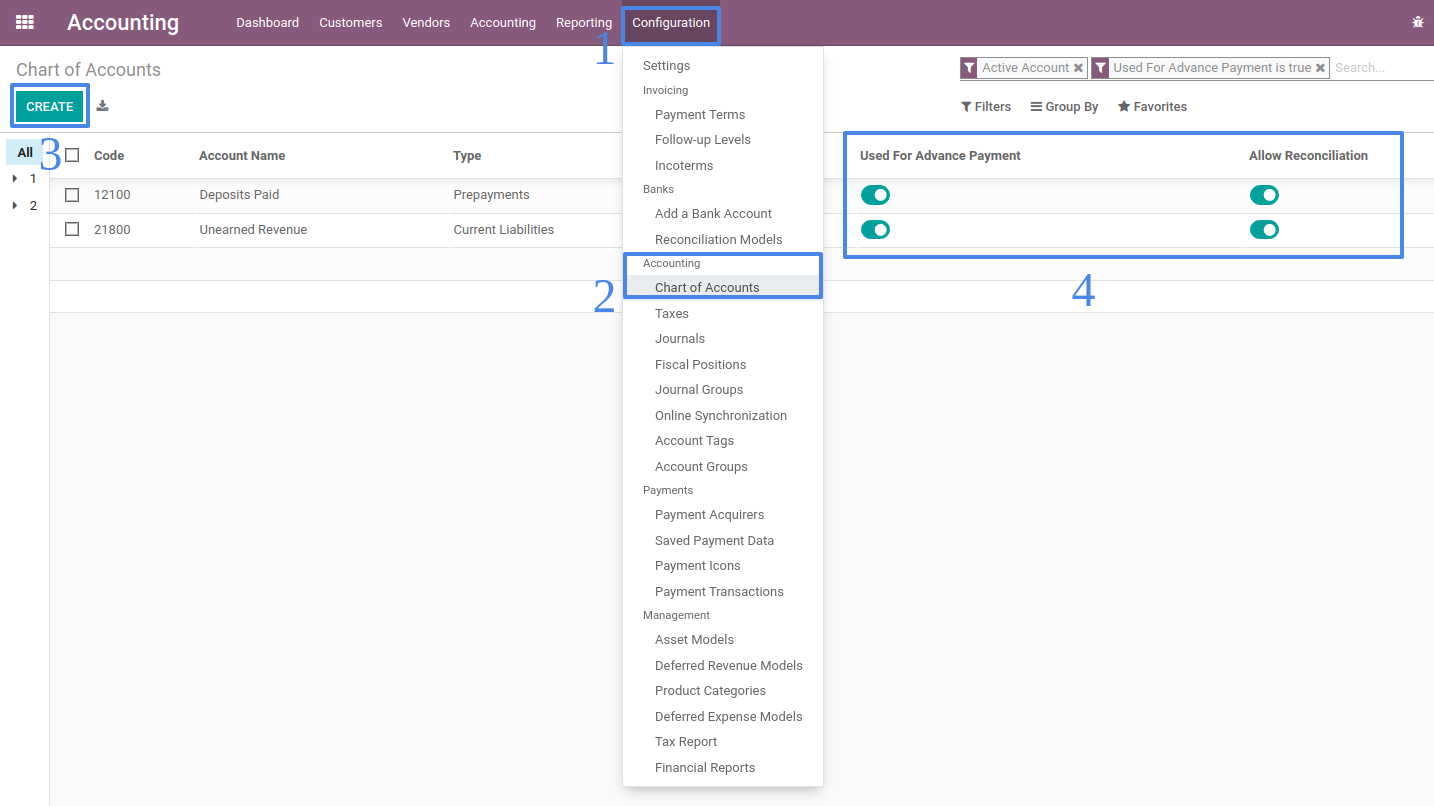
Create new accounts to be used for customer and vendor advance payments in Accounting > Configuration > Accounting > Chart of Accounts. Make sure that the created account is used for advance payment and reconcilable.
On my example, I created Unearned Revenue which is a liability to be used for customer advance payments.
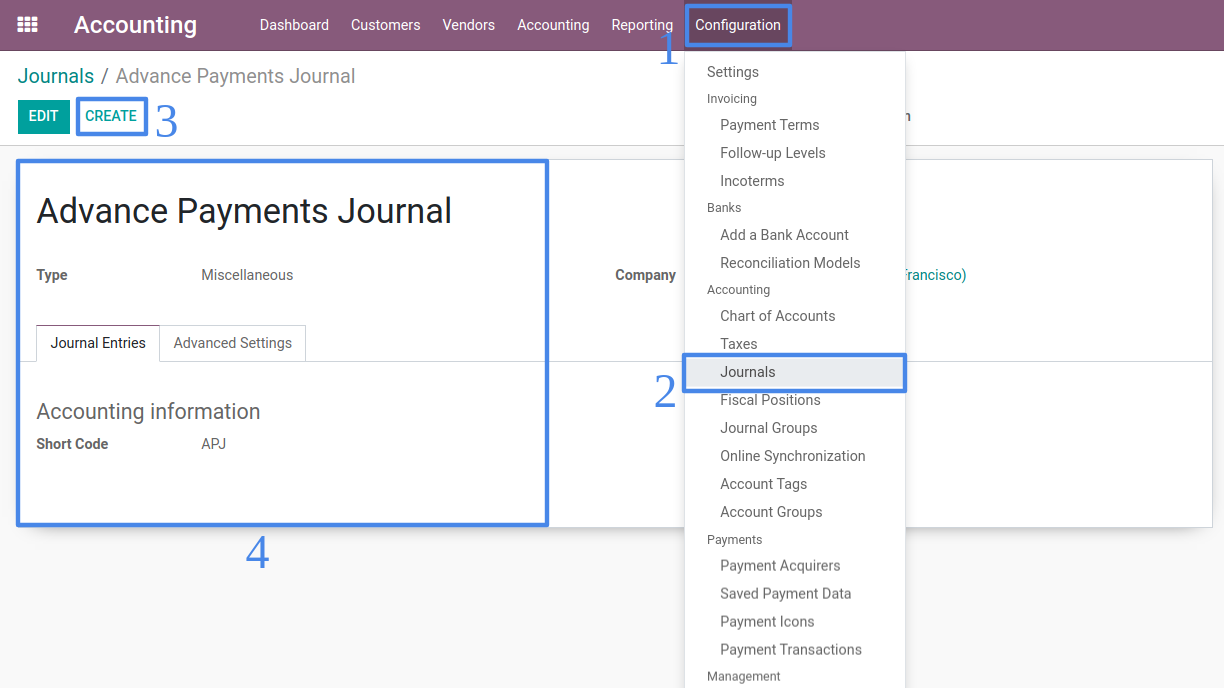
Create new Journal for Advance Payments
Create new journal to be used for customer and vendor advance payments in Accounting > Configuration > Accounting > Journals. This new journal will be used when advance payment is applied on invoices.
Set Default Configuration for Advance Payments
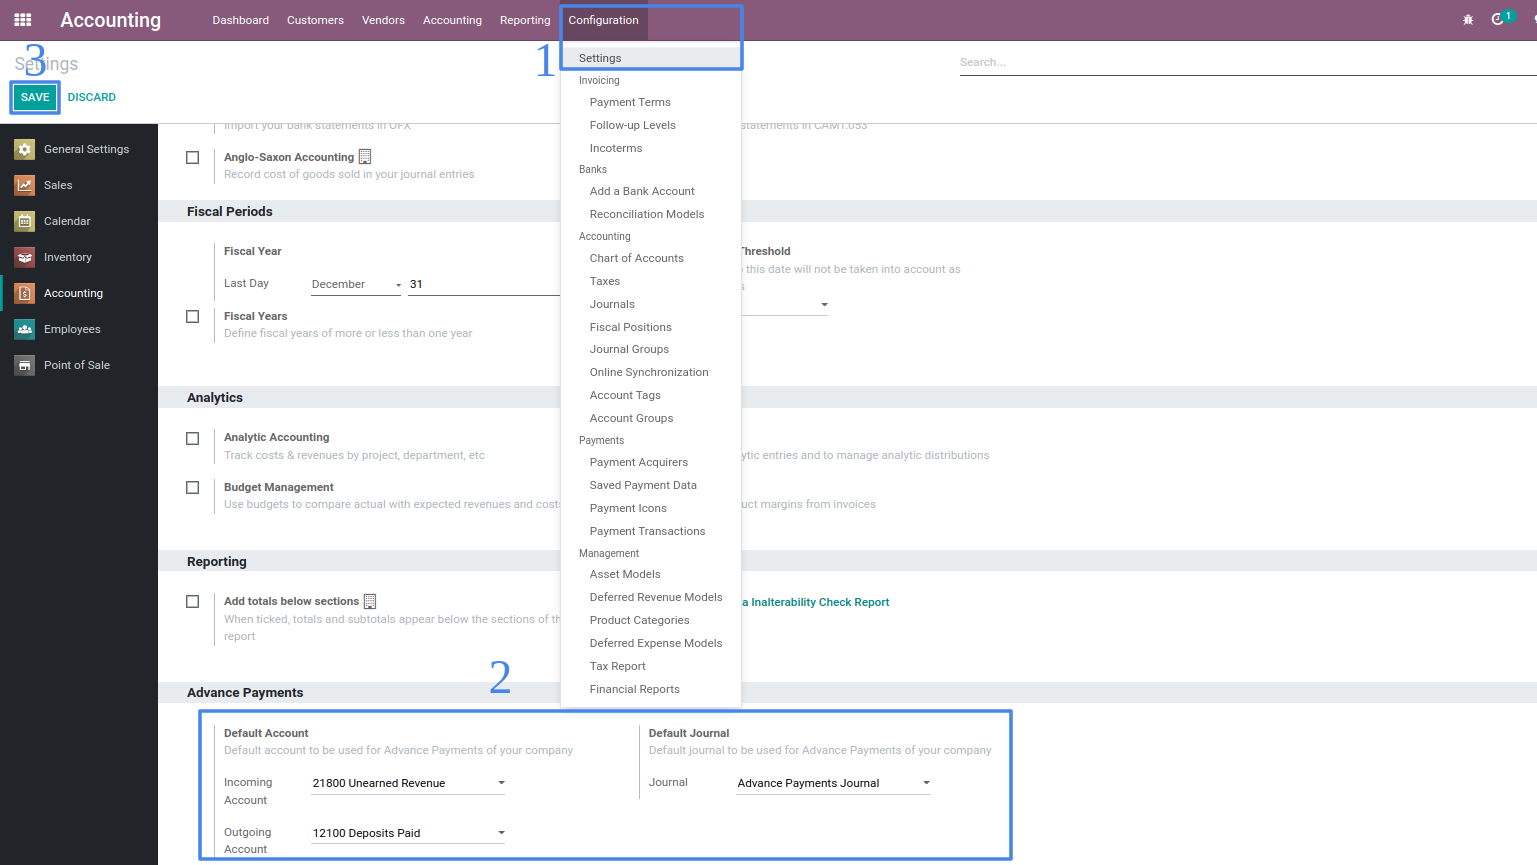
Set default configuration for the advance payments in Accounting > Configuration > Settings and set the advance payment account and journal that will likely be used often.
Procedures
Create new Advance Payments

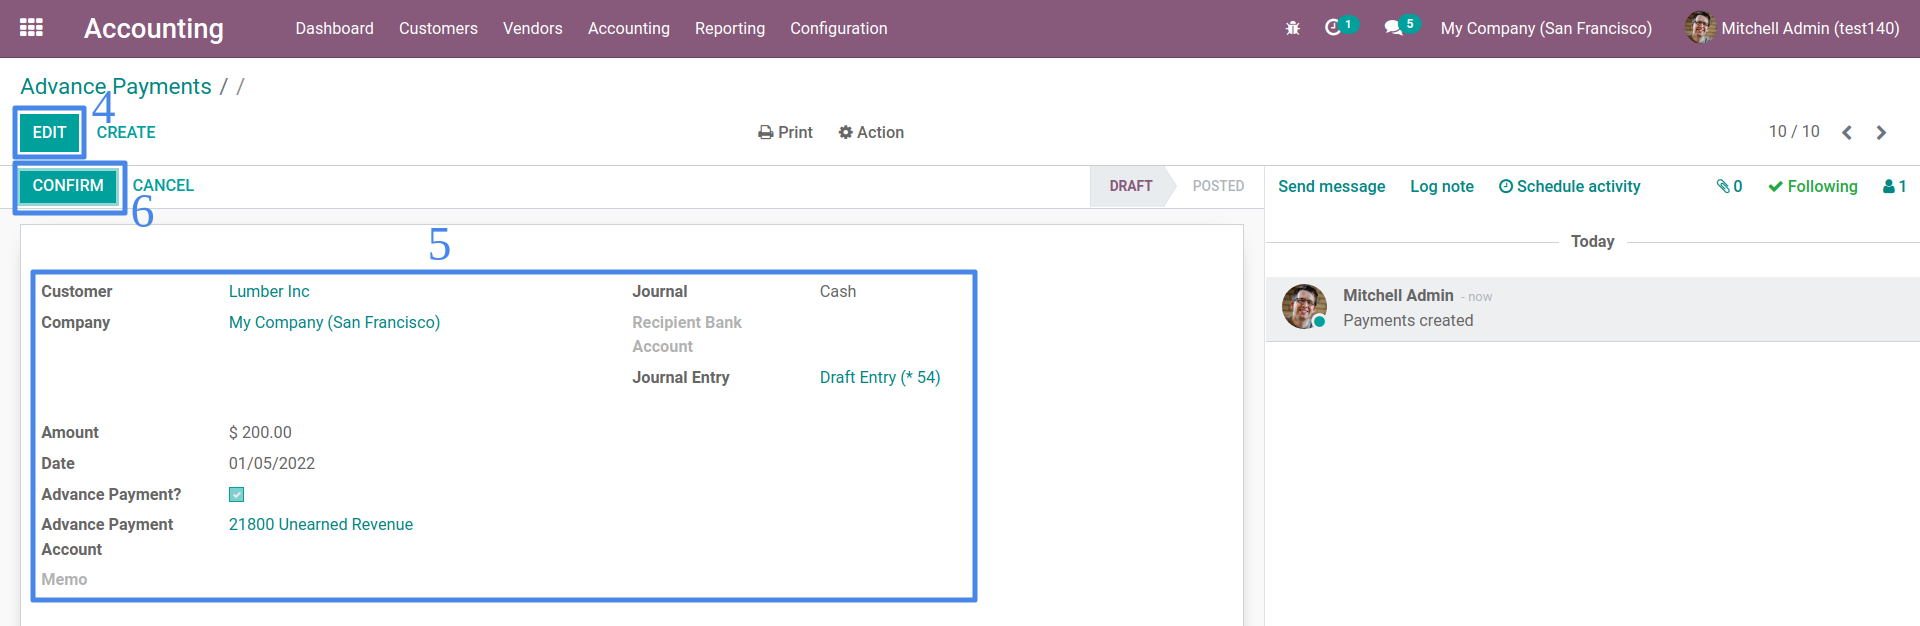
Create new customer advance payments in Accounting > Customers > Advance Payments (or create new vendor advance payments in Accounting > Vendors > Advance Payments).
Select the Customer (or Vendor), Payment Journal and Payment Amount. Set also the Payment Date when the customer (or vendor) has paid. If you set the default configuration for advance payment account, the default will be shown unless you need to change it. Save the advance payment as draft or confirm it so that it will be posted.
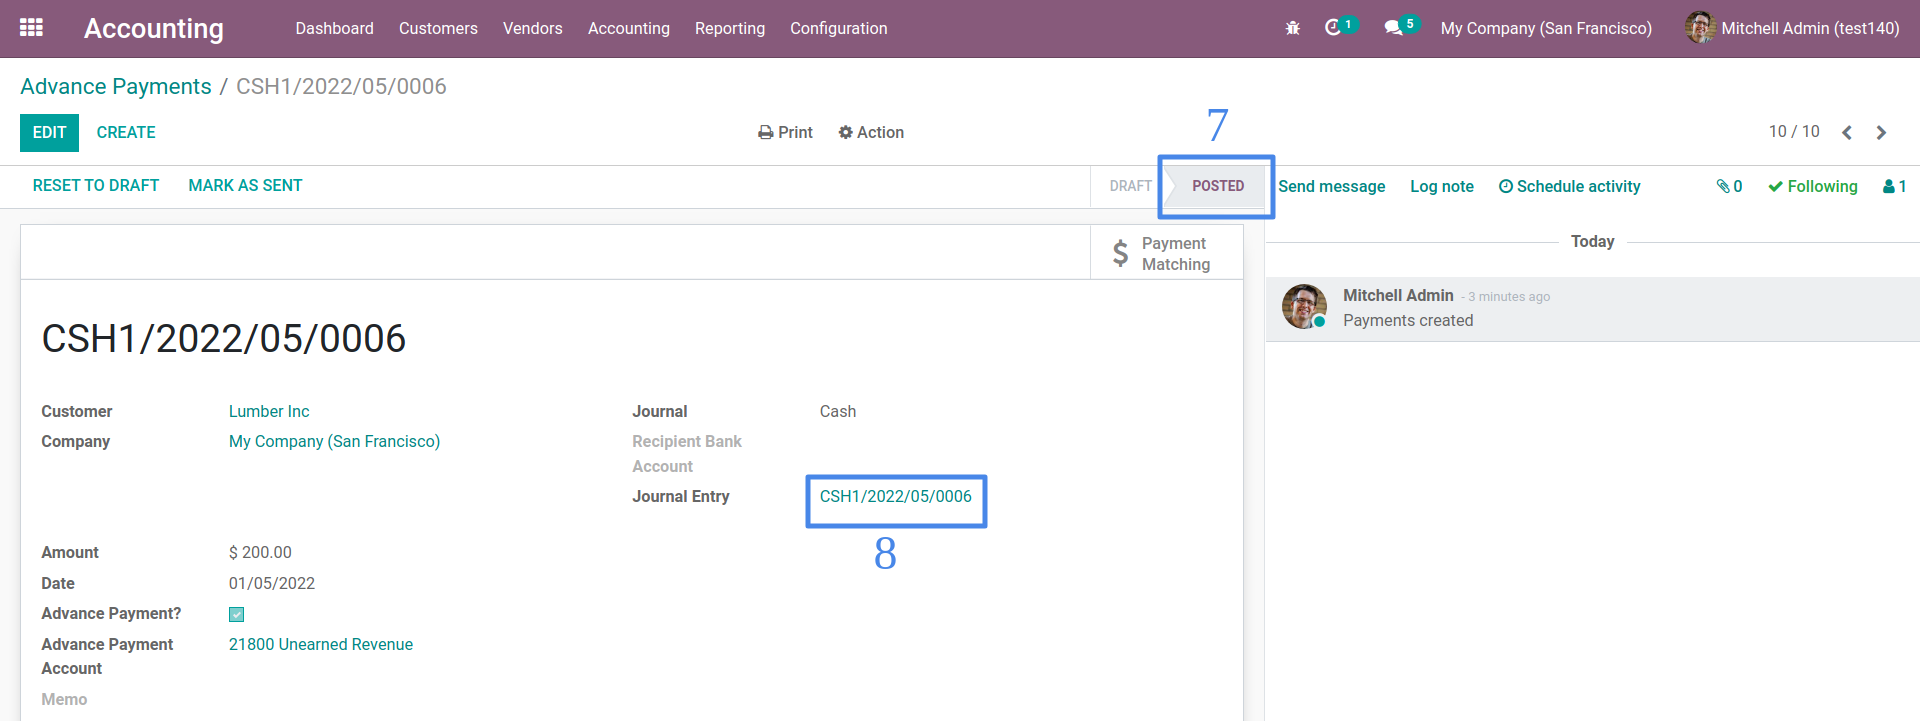
Posted advance payment can now be used to apply advance payments on invoices.
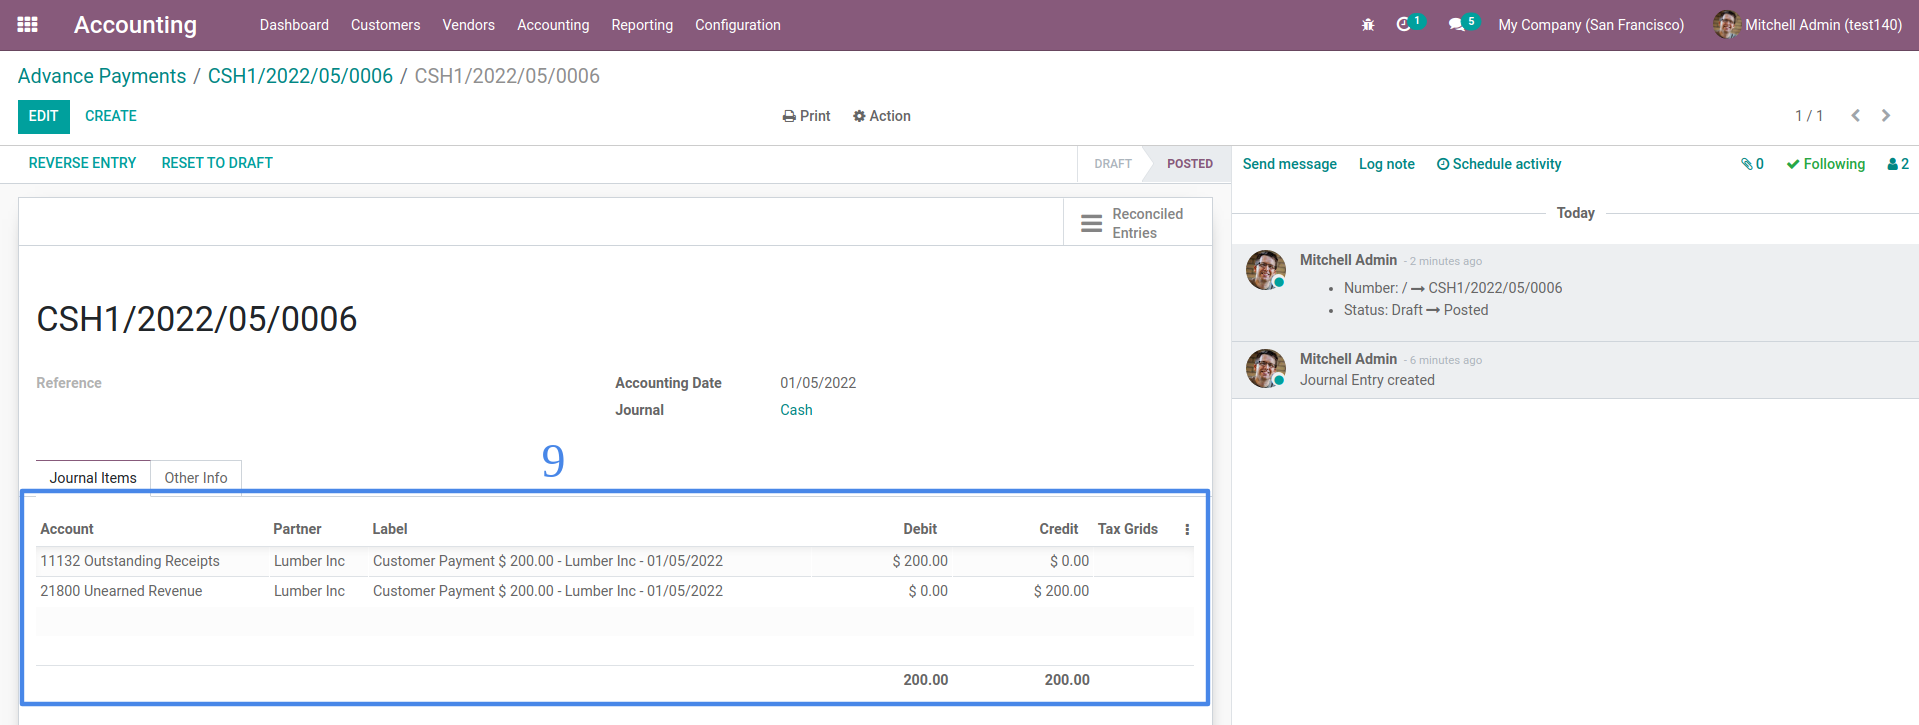
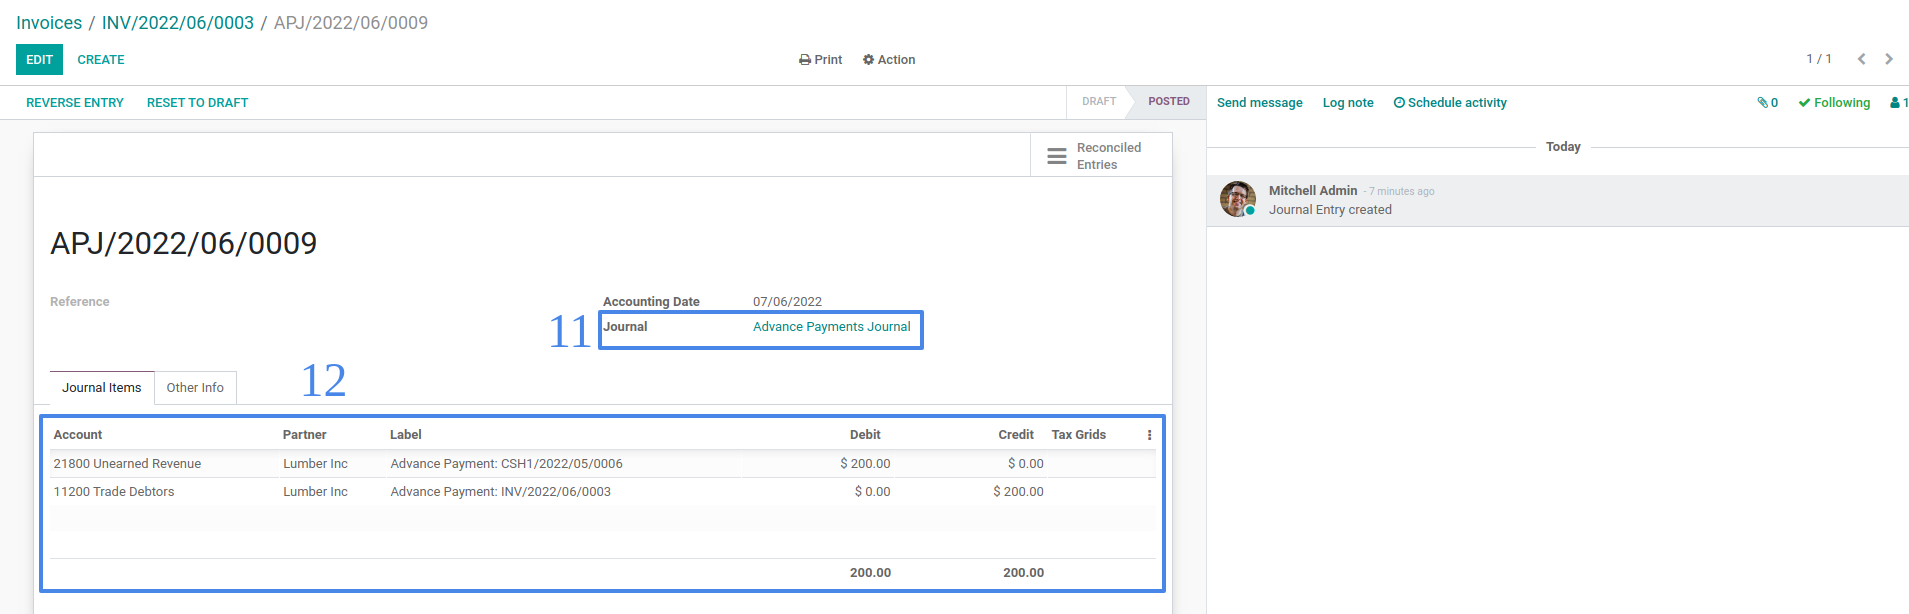
Posted advance payment will also create journal entry such that the accounts are based on the selected Payment Journal and Advance Payment Account.
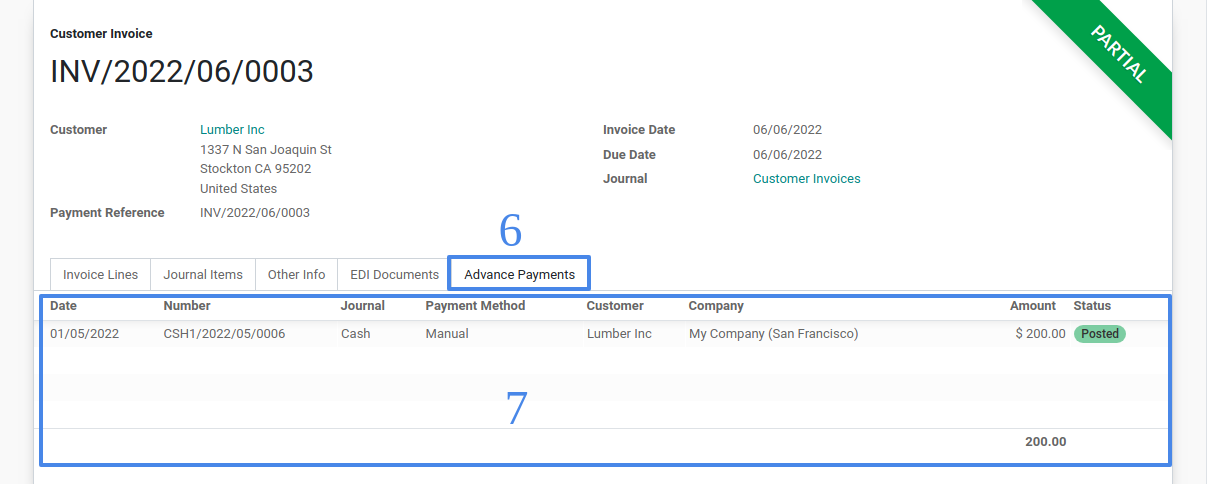
Application of Advance Payments on Invoices
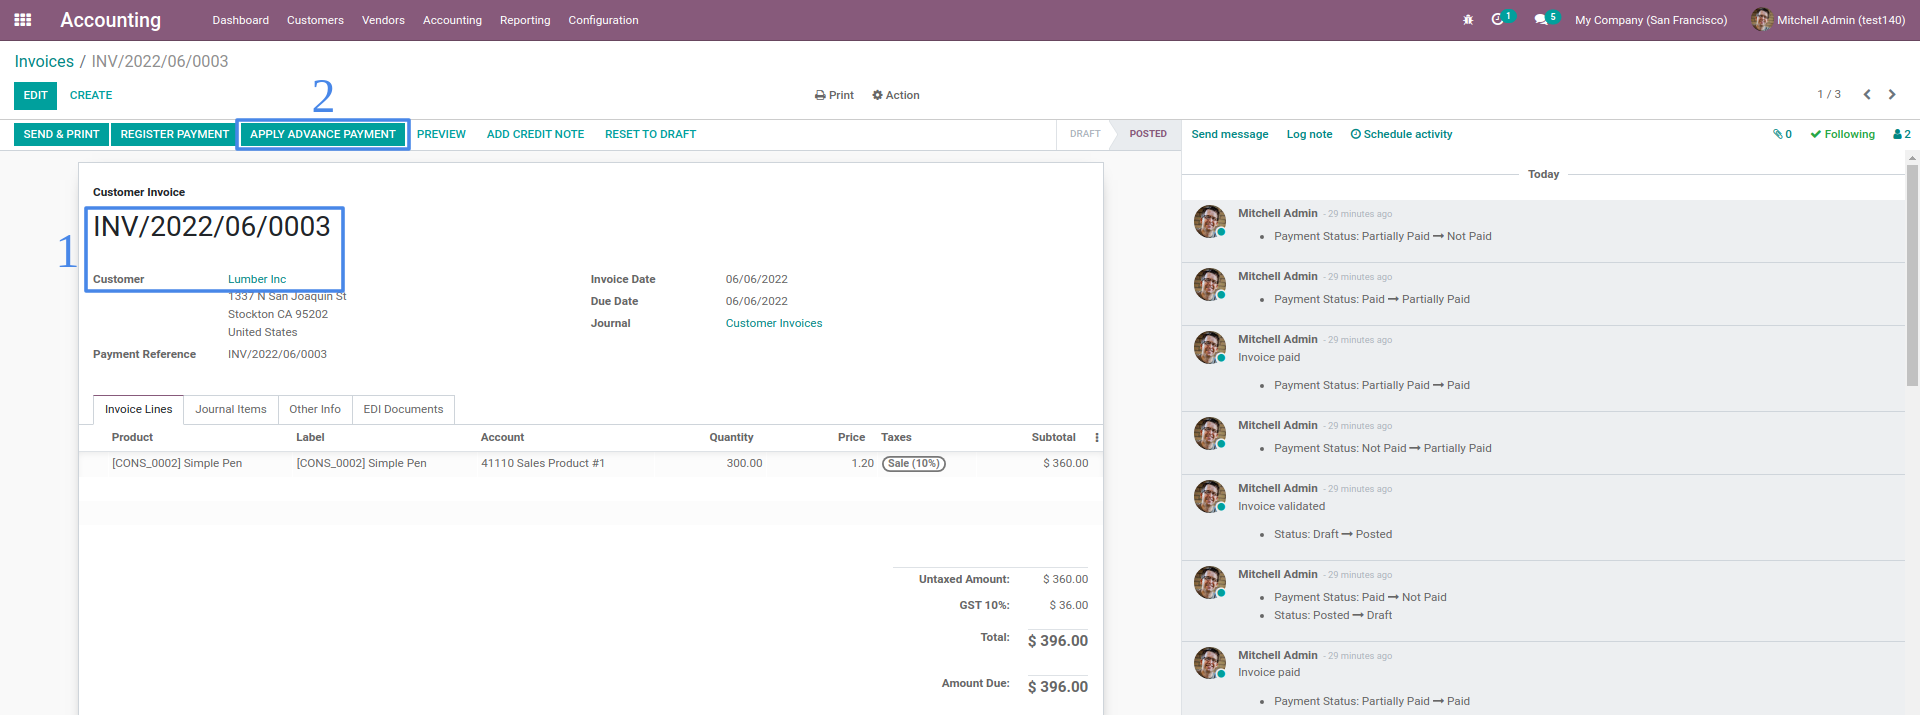
To apply advance payments on customer invoices (or vendor bills), select an Posted status invoice on Accounting > Customers > Invoices (or Accounting > Vendor > Bills).
If the customer (or vendor) has advance payment, there will be a button named Apply Advance Payment on the invoice header. If there is no button shown, it means that customer (or vendor) has no advance payments, advance payments have already been applied or invoice is already paid.
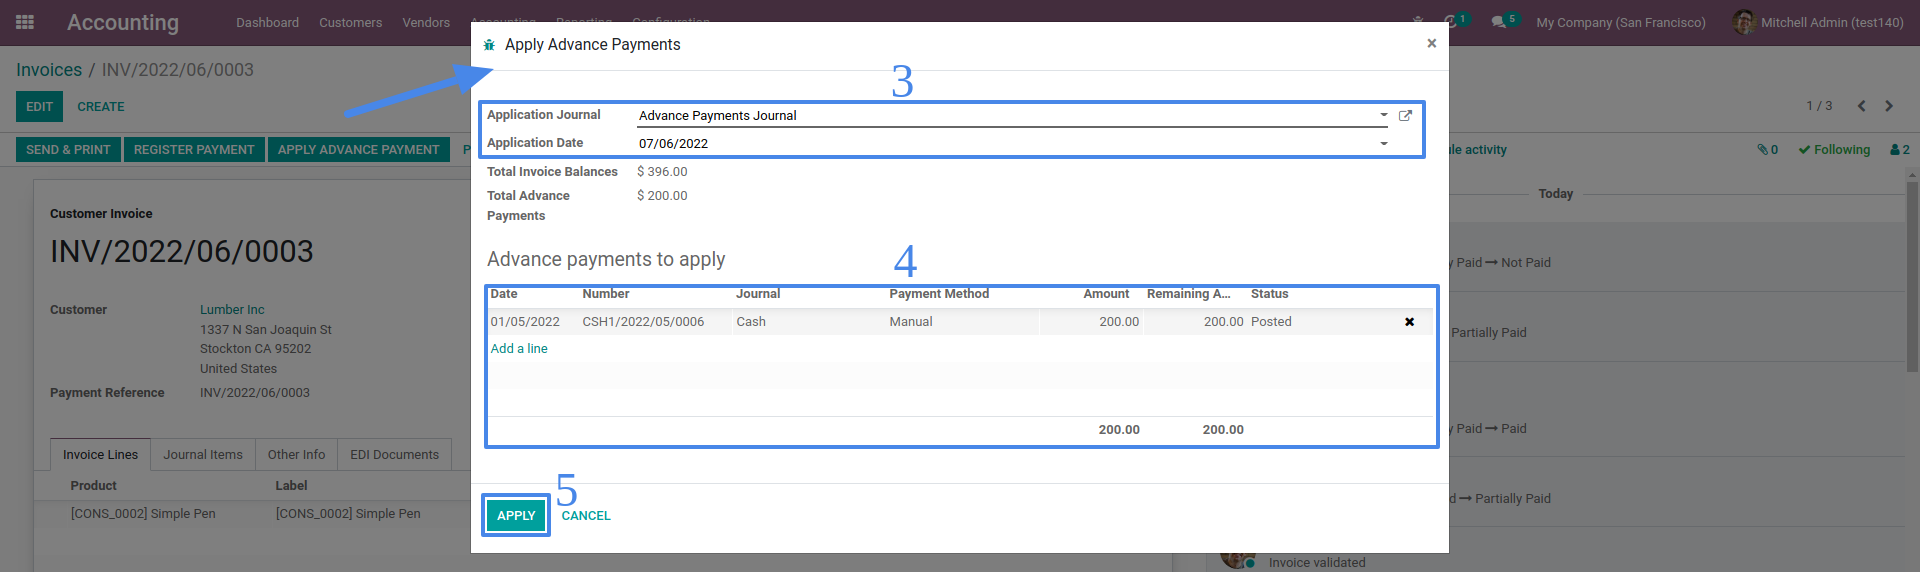
On the Apply Advance Payments window, specify the Application Journal, the default will be the configured Advance Payment Journal in settings. Select the application date and advance payments to apply. TIP: You can select multiple advance payments and you can also select multiple invoices on the invoice list.
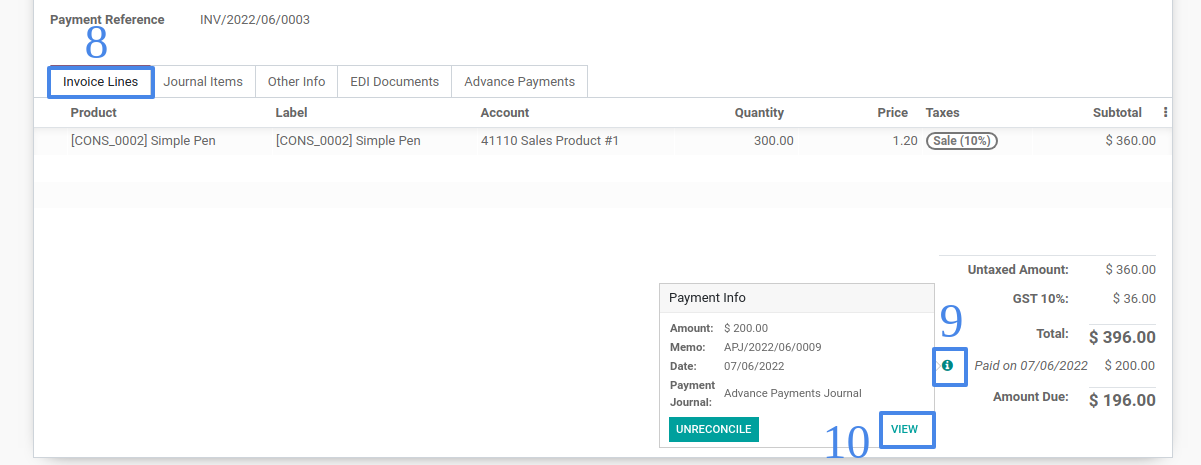
When applied on the invoice, payment will be shown below the invoice Total and in Advance Payments tab. TIP: You can unreconcile the payment by using the icon below the invoice Total but just make sure that the Advance Payment Journal is allowed on cancelling entries.
Application of advance payment on invoices will create a journal entry such that the accounts are based on the invoices account and advance payment account on payments. The amount (debit or credit) is the total of all advance payments applied.
Versions
Version 2.0.3:
- [FIXED] Setting up advance payment accounts and journal for multi-company
Version 2.0.2:
- [FIXED] Reconciled advance payments cannot be applied to any invoice
Version 2.0.1:
- [FIXED] Partial use of advance payments with multi-currency
Version 2.0:
- [FEATURE] Multi-currency support
- [FEATURE] Default for incoming and outgoing advance payment accounts
Version 1.1:
- [FEATURE] Partial use of Advance Payments
Version 1.0.1:
- [FIXED] Apply Advance Payment button in Vendor Bills
Compatibility
This module is compatible with Odoo 17.0 Community and Enterprise Editions
Support
Email: [email protected]
This software and associated files (the "Software") may only be used (executed, modified, executed after modifications) if you have purchased a valid license from the authors, typically via Odoo Apps, or if you have received a written agreement from the authors of the Software (see the COPYRIGHT file).
You may develop Odoo modules that use the Software as a library (typically by depending on it, importing it and using its resources), but without copying any source code or material from the Software. You may distribute those modules under the license of your choice, provided that this license is compatible with the terms of the Odoo Proprietary License (For example: LGPL, MIT, or proprietary licenses similar to this one).
It is forbidden to publish, distribute, sublicense, or sell copies of the Software or modified copies of the Software.
The above copyright notice and this permission notice must be included in all copies or substantial portions of the Software.
THE SOFTWARE IS PROVIDED "AS IS", WITHOUT WARRANTY OF ANY KIND, EXPRESS OR IMPLIED, INCLUDING BUT NOT LIMITED TO THE WARRANTIES OF MERCHANTABILITY, FITNESS FOR A PARTICULAR PURPOSE AND NONINFRINGEMENT. IN NO EVENT SHALL THE AUTHORS OR COPYRIGHT HOLDERS BE LIABLE FOR ANY CLAIM, DAMAGES OR OTHER LIABILITY, WHETHER IN AN ACTION OF CONTRACT, TORT OR OTHERWISE, ARISING FROM, OUT OF OR IN CONNECTION WITH THE SOFTWARE OR THE USE OR OTHER DEALINGS IN THE SOFTWARE.